Category: Python

How to install python in windows and use pip in command prompt like mac and ubuntu

These are the steps that have to be followed in order to install python in windows and to be able to install pip commands directly into your command prompt just like mac and ubuntu.

STEP 1

  • check your system settings and find out your system is 32 bit or 64 bit.
  • Accordingly, go to anaconda and download the Individual edition Python 3 (32 or 64bit )(which is open source and completely free).
  • Install the anaconda package just like normal software.
  • During installation, you will get an option under “advanced options” Add Anaconda to my PATH variable” make sure it is checked.

STEP 2

  • After installation, you’ll find anaconda prompt in your all programs
  • open it, and go to the directory where you will host/save your project/program using command “cd
  • In case you have to create a folder for your project you can make a new directory with command “mkdir foldername”
  • after getting into the directory use this command “conda create –name mydevelopment python==3.7.6”
  • press enter and say yes if it asks your permission.
  • after this, you’ll get commands to activate & deactivate (copy/write those commands in a notepad)
  • now type “conda activate mydevelopment”
  • you’ll see (mydevelopment) in your shell.
  • now you can easily use pip install and ls command in your system.

Step 3

  • you are done
  • you can access the jupyter notebook, spyder  from the anaconda navigator from all programs list
  • additional info to activate the environment if you need to install packages just like you do in Mac and Linux(ubuntu)
  • simply go to the same directory and type“conda activate mydevelopment”
  • to deactivate simply type “conda deactivate”


Some NLP Frameworks that you can try out today

7 Steps of Machine Learning

The 7 steps of any Machine Learning problem to answering questions

  1. Gathering Data
  2. Preparing the Data
  3. Choosing a Model
  4. Training
  5. Evaluation
  6. Hyperparameter Tuning
  7. Prediction


Data Gathering

We will first gather data, in order to train our model we need data for example if we are predicting whether a drink is wine or beer, so we need features like colour and alcohol percentage.

Data Preparation

We will randomise data, we can do Exploratory Data Analysis  that is to check biased that if we might have collected the beer data only that might result in beer biased data.

Data might need duplication, normalisation, error correction

Also to train the model we need to split the data in train & test, the test data will be used for model evaluation.

Choosing a Model

We have lots of models created by researches over the years like some models works good with Image data, some are good at text based data. So we’ll try to choose a model according to our requirement.

Training

Just like when someone is trying to drive a car, first the driver learns how to use brakes &  accelerator & over the time the drivers efficiency improves, the more he trains himself the more efficiency improves.

Y = mX+b

M-slope

B – y’s intercept

X – Input

Y – Output

So the values we can adjust are M & B only, there are lots of M in a model due to many features, so collection of M will be formed in to a matrix and denoted as W weight matrix and similarly for B we arrange the values into a matrix and it will be denoted as B Biases.

So in training we first initialise some random values to the model and try to predict the output with these values, So first the model performs vary poorly but after that we can compare it with the outputs that it should have produced and adjust the values in W & B then we will have more accurate predictions on the next time, each iteration (process of updating W & B) is called one training Step.

Evaluation

In evaluation we test our model against the data which is never been used for training, this metric will allow us to see how model might perform against the data model has not seen yet. That how the model will perform in the real world

A good rule of thumb is to split the data in Training & Evaluation is 80%-20% or 70%-30%.

Parameter Tuning

Predictions


Fetching Json data via Restful Api & Preprocessing

Restful api json data


Python Libraries for Data Science

Python Libraries for Data Science

Data Analysis – Machine Learning

Pandas (data preparation)

Pandas help you to carry out your entire data analysis workflow in Python without having to switch to a more domain specific language like R. Practical real world data analysis, reading and writing data, data alignment, reshaping, slicing, fancy indexing, and subsetting, size mutability, merging and joining, Hierarchical axis indexing, Time series-functionality.

See More: Pandas Documentation

Scikit-learn (Machine Learning)

  • Simple and efficient tools for implementing Classification, Regression, Clustering, Dimensionality Reduction, Model Selection, Preprocessing.
  • Built on NumPy, SciPy, and Matplotlib.

See More: Scikit-learn Documentation

Gensim (Topic Modelling)

Scalable statistical semantics, Analyse plain-text documents for semantic structure and Retrieve semantically similar documents.

See More: Gensim Documentation 

NLTK (Natural Language Processing)

Text processing libraries for classification, tokenization, stemming, tagging, parsing, and semantic reasoning, wrappers for industrial-strength NLP libraries. Working with corpora, categorising text, analysing linguistic structure.

See More: NLTK Documentation

Tables

Package for managing hierarchical datasets which are designed to efficiently cope with large amounts of data. It is built on top of the HDF5 library and the NumPy package and features an object-oriented interface which is fast, extremely easy to use tool for interactively save and retrieve large amounts of data.

See More: Tables Documentation

Deep Learning

Deep Learning is a new area of Machine Learning research, which has been introduced with the objective of moving Machine Learning closer to one of its original goals: Artificial Intelligence.

See More: Deep Learning Documentation

Data Visualization

Seaborn 

Seaborn is a Python visualisation library based on Matplotlib. It provides a high-level interface for drawing attractive statistical graphics.

See More: Seaborn Documentation

Matplotlib

It is a Python 2D plotting library which produces publication quality figures in a variety of hardcopy formats and interactive environments across platforms. Matplotlib can be used in Python scripts, the Python and IPython shell, the jupyter notebook, web application servers, and four graphical user interface toolkits.

See  More:  Matplotlib Documentation

Bokeh

Bokeh is a Python interactive visualisation library that targets modern web browsers for presentation. Its goal is to provide elegant, concise construction of novel graphics in the style of D3.js, and to extend this capability with high-performance interactivity over very large or streaming datasets. Bokeh can help anyone who would like to quickly and easily create interactive plots, dashboards, and data applications.

See More: Bokeh Documentation

Sci-py (data quality)

Python library used for scientific computing and technical computing.

SciPy contains modules for optimisation, linear algebra, integration, interpolation, special functions, FFT, signal and image processing, ODE solvers and other tasks common in science and engineering.

SciPy builds on the NumPy array object and is part of the NumPy stack which includes tools like Matplotlib, pandas and SymPy.

See More: Sci-py Documentation

Big Data/Distributed Computing

Hdfs3

hdfs3 is a lightweight Python wrapper for libhdfs3,  to interact with the Hadoop File System HDFS.

See More: Hdfs3 Documentation

Luigi

Luigi is a Python package that helps you build complex pipelines of batch jobs. It handles dependency resolution, workflow management, visualisation, handling failures, command line integration, and much more.

See More: Luigi Documentation

Hfpy

It lets you store huge amounts of numerical data, and easily manipulate that data from NumPy. For example, you can slice into multi-terabyte datasets stored on disk, as if they were real NumPy arrays. Thousands of datasets can be stored in a single file, categorised and tagged however you want. H5py uses straightforward NumPy and Python metaphors, like dictionary and NumPy array syntax. For example, you can iterate over data sets in a file, or check out the .shape or .dtype attributes of datasets.

See More: H5py Documentation

Pymongo

PyMongo is a Python distribution containing tools for working with MongoDB, and is the recommended way to work with MongoDB from Python.

See More: PyMongo Documentation

DASK

Dask is a flexible parallel computing library for analytic computing.  Dask has two main components Dynamic task scheduling optimised for computation. This is similar to Airflow, Luigi, Celery, or Make, but optimised for interactive computational workloads.“Big Data” collections like parallel arrays, data frames, and lists that extend common interfaces like NumPy, Pandas, or Python iterators to larger-than-memory or distributed environments. These parallel collections run on top of the dynamic task schedulers.

See More: Dask Documentation

Dask.distributed

Dask.distributed is a lightweight library for distributed computing in Python. It extends both the and concurrent.futures dask APIs to moderate sized clusters. Distributed serves to complement the existing PyData analysis stack to meet the following needs Low latency, Peer-to-peer data sharing, Complex Scheduling, Pure Python, Data Locality, Familiar APIs, Easy Setup.

See More: Dask.distributed Documentation

Security
  • cryptography
  • pyOpenSSL
  • passlib
  • requests-oauthlib
  • ecdsa
  • pycrypto
  • oauthlib
  • oauth2client
  • wincertstore
  • rsa

So these are some of the Python Libraries for Data Science, data analysis, Machine Learning, Security and Distributed computing.

If you think i miss out Something, let me know in the comments.

How should I integrate Pyspark with Jupyter notebook on Ubuntu 16.04?


Prerequisite for fully working of Apache Spark(pyspark) with Jupyter i.e  How to integrate Jupyter notebook and pyspark?

Step 1: – Download and Installed.

  1. Download and install Anaconda. (Anaconda comes with lots of packages like Jupyter, ipython, python3 and many more so no need to install these packages explicitly)
  2. Download and install if not installed Java(Because spark uses JVM to run.)
    to check Java is install run this command in terminal :-  $java -version or $which java (it returns path of java executable.)
  3. Download Spark and untar and move to your desired location and better to rename it as a spark.
  4. Data (in CSV format) to check for a proper working of Apache Spark.

Step 2: – Setting up Environment Variable.

  • Copy the path from your preferred installation and then open /etc/environment using nano or your favorite text editor. Note in setting environment variable path of folder is given not the executable file
    $ sudo nano /etc/environment
  • JAVA_HOME="/usr/lib/jvm/java-8-oracle"
  • PATH=/path/of/Anaconda/bin:$PATH   # (Anaconda bin directory contains jupyter, ipython, python3 )
    To see PATH:- echo $PATH
    Note again:-  executable(software) is search and executed in order as its display in the output in echo $PATH
  • Reload the environment variable file by running this command
    source /etc/environment

Step 3: – Configure Apache Spark file spark-env.sh in conf folder

  • cd /path/of/your/spark/folder/spark/conf/
  • cp spark-env.sh.template spark-env.sh
  • nano spark-env.sh
  • add these line:
    export PYSPARK_PYTHON=/Path/of/anaconda//bin/python3
    export PYSPARK_DRIVER_PYTHON=/Path/of/anaconda//bin/jupyter
    JAVA_HOME=/path/of/java/usr/lib/jvm/java8-oracleStep 4:- Configure Apache Spark pyspark file in bin folder
  • go to line 85 add this
    export PYSPARK_DRIVER_PYTHON=jupyter
  • go to line 86 add this
    export PYSPARK_DRIVER_PYTHON_OPTS=“notebook”
  • Save all
    Step 5: – To Launch pyspark in jupyter which is a web-browser-based version of IPython, use:-
    PYSPARK_DRIVER_PYTHON_OPTS=”notebook” /path/of/spark//spark-1/bin/pyspark

Twitter Trend Analysis Twitter API

twitter api


Exploring trending topics on twitter using Twitter API in Python

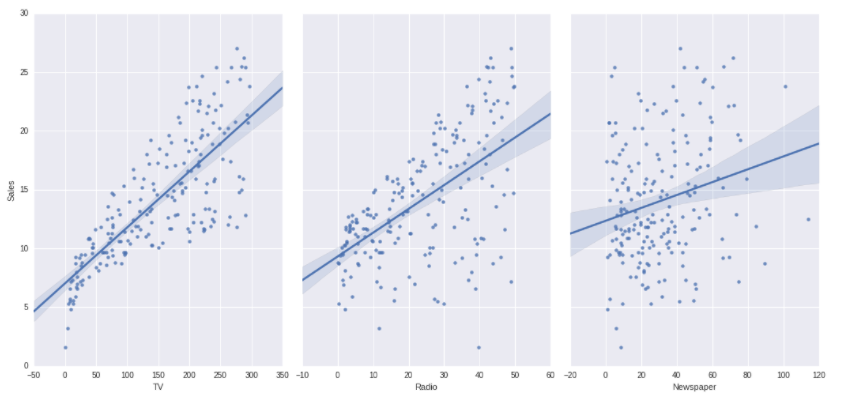
Linear Regression: Advertising Dataset

Linear Regression

Machine Learning Model of advertising dataset using Linear Regression in Python

NLTK – Natural Language Processing in Python

Natural Language Processing

In our day-to-day life we generate a lot of data like tweets, facebook posts, comments, Blog posts, articles which are generally in our natural language and which  falls in category of semi-structured  and unstructured data, So as when we process natural language data “the unstructured data – plain text”  we call it Natural Language Processing. 

Natural Language Tool Kit is a library for NLP which deals with natural language such as plain text, words, sentences.

Building blocks of NLTK

  • Tokenizers – Separating the text in to words and sentences

word tokenizer – separate by word

sentence tokenizer – separate by sentence

  • Corpora – body of text such as any written speech, news article.
  • Lexicon – dictionary, meaning of the words. which can be differ in context they are used.

let’s understand how the NLTK works, consider a sample_text such as

sample_text = “Hey jimmy, How are you? Today is my birthday. let’s go for lunch today. I’m throwing a party at the Hard rock cafe
Here if we would like to separate every sentence we could do that with normal programming putting conditions like treat a new sentence after every full stop but in some scenarios our conditions will fail like if we have Ms. in our sentence then it would consider the further content after Ms. a new sentence.
sample_text = “Ms. Margaret, How are you? Today is my birthday. let’s go for lunch today. I’m throwing a party at the Hard rock cafe


So NLTK comes to the rescue and separate the body of text (Corpora) in to sentences & words like


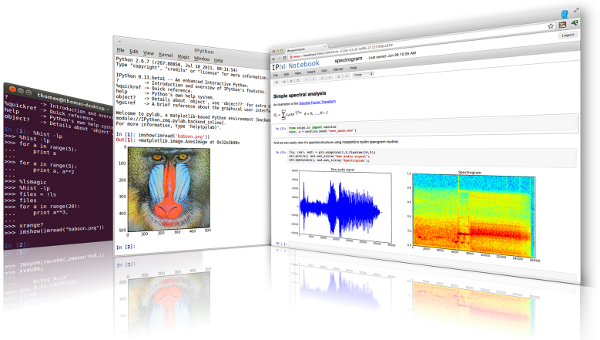
Introduction iPython Notebook

ipython notebook

iPython Notebooks are the best way to showcase your Analysis, with the help of ipython notebooks you can tell stories with your code by embedding different types of visualizations, images and text. These iPython Notebooks are the simplest way to share you whole code history with your team-mates just like a blog.

As the name suggest iPython is it only for python language?

The answer is NO, You can do your analysis or write your code in other popular languages like julia, ruby, javaScript, C#, R, Scala, cython, jython, perl, php, bash, prolog, java, C, C++ and many more.

Make sure you install the specific kernel of the particular programming language. By default ipython kernel is preinstalled.


Is it iPython Notebook or jupyter Notebook?

The answer is both, This project was termed as iPython when it was developed and later on it was merged under a parent project named as jupyter notebook, so that it will not only reflected as notebook for python. So in some cases you’ll find people referring jupyter notebooks as ipython notebooks. And for those who have just started using or about to use the notebook both are the same thing don’t get confused.

Try without installing

Online Demo of jupyter notebook (Try the code in Python, Haskell, R, Scala).

Installing iPython Notebook

Simplest installation with Anaconda Python distribution available for Windows, Mac and Ubuntu.


Sharing the iPython notebooks

Embedding inside a webpage

  • First download the notebook in .ipynb format.
  • Open the downloaded file .ipynb in notepad (or any other text editor).
  • Select all (Ctrl+A) the contents of the file.
  • Go to https://gist.github.com/
    • Enter the file name with extension & description.
    • Paste the contents that you copied from .ipynb file in the gist
  • Click create public gist.
  • Copy the embedded code, example        <scriptsrc=”https://gist.github.com/AnuragSinghChaudhary/6097a6a447f26d1256fc.js”></script>
  • Paste this code inside any web page under HTML code your python notebook will embed inside the web page.
  • You’ll be able to see the embedded iPython notebook under this web page as example.

Personal Notes:

  • I’m using iPython notebooks for all my analysis practice.
  • I have written this post in context of data science.
  • iPython notebooks can be used in wide variety of context with other programming languages.